FANTASTiC | 27 April 2024 | 1.3 GB
Soundscapes 通过颗粒合成开辟了音调和无调性声音设计的全新声音调色板。 它充满了有趣的纹理,融合了小提琴家 Michael Levine 的样本。 与我们通常的交响乐风格不同,Soundscapes 是我们 CineSymphony 系列的一个受欢迎的对比和独特的合作伙伴。
可能性是无止境。 我们在几个类别中创建了一组补丁来帮助您入门。 在我们的一个补丁中尝试完全不同的示例并制作您自己的!
补丁类别:
•脉冲(音调和无调性)
•纹理(色调和无色调)
•一击
•护垫
•声音设计
*** 请记住,以下某些参数的高值会给您的 CPU 带来沉重负担。 因此,某些补丁可能无法在完全加载的模板中正常工作。 ***
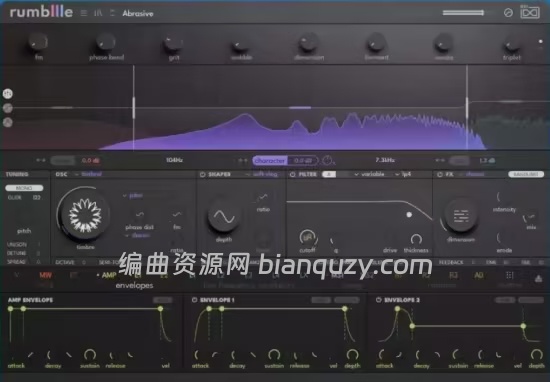
有 2 个页面:ENGINE 和 FX。
在 ENGINE 页面中,从顶部下拉菜单的 25 个类别中选择声音样本。 声音样本显示在顶部的波形窗口中。
•AUTO MAP 强制样本符合键盘上的A440。 关闭时,样本按中 C 音播放。
•按下某个键时,POSITION 将播放头设置在声音样本中所需的起始点。
•SMOOTH 更平滑地调整播放头的位置。
•“体积”控制谷物的体积。 不同的设置可以产生广泛的输出电平。
• MOTION 控制移动谷物。 它确定从起始位置发生多少移动(向前或向后)。 较低的值集中于声音样本的较小区域,提供更一致的纹理。 +100%是实时播放。
•DENSITY 决定每秒播放多少个样本颗粒。 值越高,声音就越平滑饱满。 *较高的 DENSITY 值也会增加 CPU 使用率。
•RAND DENSITY 根据DENSITY 设置打乱并随机化每个颗粒的时间。 可以将其视为将颗粒的播放解量化为更人性化的播放。 较高的值可防止定相和梳状滤波。
单击 TEMPO SYNC 以有节奏地同步到您的 DAW。 密度现在调整每条的颗粒数量。 为了使速度同步补丁在 Kontakt 中独立工作,需要运行传输才能使实时量化工作:
ATTACK 和 DECAY 旋钮可调节每个颗粒的起音和衰减音量包络。 值越高听起来越平滑。 您可以通过按 ATTACK 旋钮上方的 AUTO 自动设置这些值。 引擎将根据 DENSITY 值设置这些值,以提供 100% 的颗粒重叠以获得平滑的声音。 当 TEMPO SYNC 打开时,AUTO 将重新计算 ATTACK 和 DECAY 的毫秒数以提供 100% 重叠。 选择“自动”后,您可以根据百分比增加或减少重叠。 *较高的 DENSITY 以及 ATTACK 和 DECAY 值将增加 CPU 使用率。 如果您想要更大的厚度,请保持适度并稍微增加间距和宽度。
PITCH 随机改变每个颗粒的音高 (RAND),或者从播放头周围的随机点设置每个颗粒的音高 (DRIFT),并与前一个颗粒变化几美分。 值越高,合唱效果越好。 您可以使用 x12 将其从 100 音分乘以一个八度。
JITTER 决定了颗粒从播放头随机生成的距离 (RAND) 或在范围内徘徊 (DRIFT)。 对于较大的样本,您可以将其增加 x100。 与 MOTION 一样,较低的值侧重于声音样本的较小区域,从而提供更一致的纹理。 RAND – 较高的值从更多的声音样本中提取,从而提供更广泛的纹理。 DRIFT – 较高的值赋予每个单独的键不同的纹理。
WIDTH 随机平移每个颗粒以增加立体声宽度。 HQ 模式使用 Kontakt 的环绕声声像器(使用稍多的 CPU)。
淡入和淡出通过单独改变每个颗粒的体积和过滤来给颗粒带来渐强和渐弱的效果。 这可用于为每次按键提供更长的攻击或释放时间。
Soundscapes opens up an entirely new sonic palette of tonal and atonal sound design through granular synthesis. Full of interesting textures, it incorporates samples from violinist Michael Levine. A departure from our usual symphonic style, Soundscapes is a welcome contrast and unique partner to our CineSymphony lineup.
The possibilities are endless. We’ve created a set of patches in a few categories to give you a start. Try a totally different sample in one of our patches and make your own!
Patch Categories:
•Pulses (Tonal and Atonal)
•Textures (Tonal and Atonal)
•One Shots
•Pads
•Sound Design
*** Keep in mind, high values of some of the parameters below will heavily tax your CPU. Therefore, some patches may not work well in a fully loaded template. ***
There are 2 pages: ENGINE and FX.
From the ENGINE page, chose your sound sample from 25 categories in the pull down menus at the top. The sound sample is displayed in the waveform window at the top.
•AUTO MAP forces the sample to conform to A440 on your keyboard. When off, the sample plays as is at Middle C.
•POSITION sets the playhead at the desired starting point in the sound sample when you press a key.
•SMOOTH adjusts the position of the playhead more smoothly.
•The VOLUME controls the volume of the grain. Various settings can lead to a wide range of output levels.
•The MOTION control moves the grains. It determines how much movement occurs (forward or backward) from the starting POSITION. Lower values focus on a smaller area of the sound sample delivering a more consistent texture. +100% is real time playback.
•DENSITY determines how many grains of the sample are played per second. Higher values render a more smooth a full sound. *Higher DENSITY values also increase CPU usage.
•RAND DENSITY shuffles and randomizes the timing of each grain based on the DENSITY setting. Think of it as unquantizing the playback of the grains to a more humanized playback. Higher values prevent phasing and comb filtering.
Click TEMPO SYNC to rhythmically sync to your DAW. The DENSITY now adjusts the number of grains per bar. For the tempo sync patches to work in Kontakt standalone, the transport needs to be running for the live quantize to work:
The ATTACK and DECAY knobs adjust the attack and decay volume envelope of each grain. Higher values sound more smooth. You can automatically set these values by pressing AUTO above the ATTACK knob. The Engine will set these values based on the DENSITY value to provide a 100% overlap of the grains for a smooth sound. While TEMPO SYNC is on, AUTO will recalculate the number of miliseconds for the ATTACK and DECAY to provide a 100% overlap. While AUTO is selected, you can increase or decrease the overlap based on percentage. *Higher DENSITY and ATTACK and DECAY values will increase CPU usage. If you want more thickness, keep them moderate and slightly increase PITCH and WIDTH.
PITCH varies the pitch of each grain either randomly (RAND), or will set the pitch of each grain from random points from around the playhead (DRIFT) and vary it a few cents from the previous grain. Higher values give a greater chorusing effect. You can multiply this from 100 cents to one octave by using x12.
JITTER determines how far the grain is generated from the playhead either randomly (RAND), or wandering around within the range (DRIFT). You can increase this by x100 for larger samples. Like MOTION, lower values focus on a smaller area of the sound sample delivering a more consistent texture. RAND – Higher values pull from more of the sound sample giving a wider variety of texture. DRIFT – higher values give each individual key a different texture.
WIDTH randomly pans each grain to increase stereo width. HQ mode uses Kontakt’s surround panner (uses slightly more CPU).
FADE IN and FADE OUT give the grains a crescendo and decrescendo effect by individually altering the volume and filtering of each grain. This can be used to give each keypress a longer attack or release.